
 |
| |
| |
| |
| |
Making Stained Glass.
The process of making a stained glass window has changed very little since the medieval era. A monk from northwestern Germany named Theophilus wrote extensively about the creation of stained glass windows in his book, De Diversis Artibus. The largest differences between what Theophilus described and modern stained glass has mostly to do with the innovation of tools and technology. The following 9 steps are largely the same.
 1. The Sketch
Although Theophilus did not write about this step, it is probable that window designers submitted a small color drawing done in watercolors
and inks on vellum to the donor for approval before the main work began. Also likely is that the donor would simply specify a window to be
imitated, and the designer had no need for a sketch.
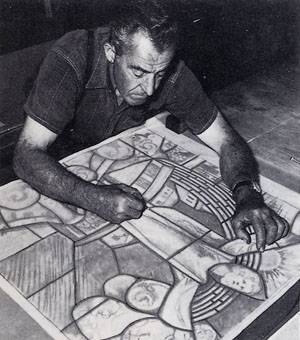
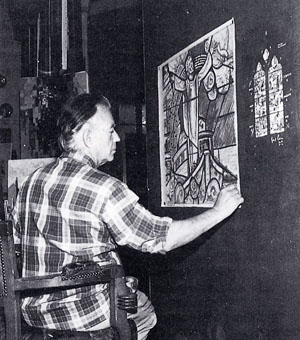 2. The Cartoon
Using a whitewashed board, the artist would mark out the exact dimensions of a panel. The artist then squared-up the sketch and cartoon to
enlarge his original image. Figures were then outlined with great care, and an amount of detail was added, varying on whether or not the
artist would be painting the glass himself. This was a full-size drawing and had to be to the exact dimensions needed.
3. Cutting the Glass
Various colored sheets of glass were chosen by the artist, placed on top of the cartoon, and marked with wet chalk, tracing the images below.
A tool called the dividing iron was then heated in the fire. When the tip was glowing, the tool was applied to the glass where it was to be
cut until a small fissure appeared. The tool was then drawn along the dividing line, lengthening the fissure as it moved. For a more
precise cut, a grozing iron was used. This tool was a bar of iron with slots matching the thickness of the glass cut in either end. It was
used to break off very small pieces, nibbling away at the glass. As each piece of glass was cut, another piece was rubbed against it to dull
the edges. Powdered stone was used as an abrasive to grind away the reflective shine the colored glass possessed, creating a matte
surface.
 4. Painting the Glass
To add details such as folds in garments, facial features, and lettering, dark brown enamel was painted on the cut glass. The enamel consisted mainly of iron oxide, powdered glass, and borax flux. Around the year 1300, silver stains, usually silver nitrate mixed with gum and water, began
being used to tone lighter glass. This process yielded a variety of yellow and orange hues that were often used for crowns or haloes, and
when combined with blue glass created green colors used for trees and grass. Staining also allowed a range of colors on a single piece of
glass, which was previously impossible.
5. Firing
After being painted, the glass was placed in a kiln and heated to about 1250 degrees Fahrenheit. This caused the paint and glass to smoothly
and permanently fuse together. Medieval kilns were made of clay, and sat atop iron rods. Beech wood was used to heat the kiln while
giving a clear flame. The painted glass was placed in a cold kiln, laid on iron trays, each covered with a smooth layer of powdered plaster,
and then fired to temperature. When temperature had been reached and maintained for about fifteen minutes the kiln was very slowly cooled.
Cooling the glass too quickly would cause it to crack or break.
6. Leading
Every piece of glass had malleable lead strips fitted around it. Viewed from the cross-section these lead strips looked like an I or sideways
H. Normally the lead was cast on the spot and poured into boxes lined with reeds called calmes. Theophilus wrote that the leading usually
began with the central image or figure and progressed outward. This continued until each piece of glass was in place and the entire panel
was outlined with lead. Each joint was cleaned, rubbed with flux, and soldered on both sides of the panel.
7. Cementing
When the soldering was complete, dark gray cement was created. This was usually a mixture of powdered whitening and plaster of Paris to
which was added a little red lead, some lampblack, white spirit and boiled linseed oil. It was then poured over the entire panel, filling
the spaces between glass and lead with the help of a scrubbing-brush. This was also done on both sides of the panel. Sawdust was spread over the surface to absorb the excess cement, making it easy to brush off and clean the glass.
8. Banding
Copper ties for the edges and middle of the panel were soldered to the window leading. Division ties held multiple panels together,
twisting with other division ties around a glazing bar, where two panels met. Ties in the middle of the panel were twisted around
additional supportive bars. Both of the two types of bars were usually about one and a half feet long and support three or four ties
each.
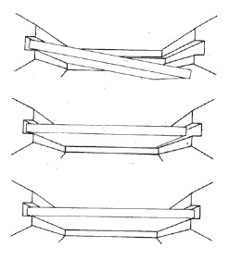 9. Installation
Apertures often had L-shaped channels cut into the stone wall, into which the window would be placed. Also holes were cut for the glazing bars to fit into. Panels were inserted one at a time into the channels going from the base up. If a panel was slightly too wide it could be sprung into place by being slightly bent. Ties were fastened loosely around their bars and when all the panels had been put in place, were tightly fastened. The final step was to fill what remained of the channels with ordinary cement or mastic. If all had been done correctly the window could be expected to remain intact for the next hundred years.
1. The SketchAlthough Theophilus did not write about this step, it is probable that window designers submitted a small color drawing done in watercolors and inks on vellum to the donor for approval before the main work began. Also likely is that the donor would simply specify a window to be imitated, and the designer had no need for a sketch.
2. The CartoonUsing a whitewashed board, the artist would mark out the exact dimensions of a panel. The artist then squared-up the sketch and cartoon to enlarge his original image. Figures were then outlined with great care, and an amount of detail was added, varying on whether or not the artist would be painting the glass himself. This was a full-size drawing and had to be to the exact dimensions needed.
Various colored sheets of glass were chosen by the artist, placed on top of the cartoon, and marked with wet chalk, tracing the images below. A tool called the dividing iron was then heated in the fire. When the tip was glowing, the tool was applied to the glass where it was to be cut until a small fissure appeared. The tool was then drawn along the dividing line, lengthening the fissure as it moved. For a more precise cut, a grozing iron was used. This tool was a bar of iron with slots matching the thickness of the glass cut in either end. It was used to break off very small pieces, nibbling away at the glass. As each piece of glass was cut, another piece was rubbed against it to dull the edges. Powdered stone was used as an abrasive to grind away the reflective shine the colored glass possessed, creating a matte surface.
4. Painting the GlassTo add details such as folds in garments, facial features, and lettering, dark brown enamel was painted on the cut glass. The enamel consisted mainly of iron oxide, powdered glass, and borax flux. Around the year 1300, silver stains, usually silver nitrate mixed with gum and water, began being used to tone lighter glass. This process yielded a variety of yellow and orange hues that were often used for crowns or haloes, and when combined with blue glass created green colors used for trees and grass. Staining also allowed a range of colors on a single piece of glass, which was previously impossible.
After being painted, the glass was placed in a kiln and heated to about 1250 degrees Fahrenheit. This caused the paint and glass to smoothly and permanently fuse together. Medieval kilns were made of clay, and sat atop iron rods. Beech wood was used to heat the kiln while giving a clear flame. The painted glass was placed in a cold kiln, laid on iron trays, each covered with a smooth layer of powdered plaster, and then fired to temperature. When temperature had been reached and maintained for about fifteen minutes the kiln was very slowly cooled. Cooling the glass too quickly would cause it to crack or break.
Every piece of glass had malleable lead strips fitted around it. Viewed from the cross-section these lead strips looked like an I or sideways H. Normally the lead was cast on the spot and poured into boxes lined with reeds called calmes. Theophilus wrote that the leading usually began with the central image or figure and progressed outward. This continued until each piece of glass was in place and the entire panel was outlined with lead. Each joint was cleaned, rubbed with flux, and soldered on both sides of the panel.
When the soldering was complete, dark gray cement was created. This was usually a mixture of powdered whitening and plaster of Paris to which was added a little red lead, some lampblack, white spirit and boiled linseed oil. It was then poured over the entire panel, filling the spaces between glass and lead with the help of a scrubbing-brush. This was also done on both sides of the panel. Sawdust was spread over the surface to absorb the excess cement, making it easy to brush off and clean the glass.
Copper ties for the edges and middle of the panel were soldered to the window leading. Division ties held multiple panels together, twisting with other division ties around a glazing bar, where two panels met. Ties in the middle of the panel were twisted around additional supportive bars. Both of the two types of bars were usually about one and a half feet long and support three or four ties each.
9. InstallationApertures often had L-shaped channels cut into the stone wall, into which the window would be placed. Also holes were cut for the glazing bars to fit into. Panels were inserted one at a time into the channels going from the base up. If a panel was slightly too wide it could be sprung into place by being slightly bent. Ties were fastened loosely around their bars and when all the panels had been put in place, were tightly fastened. The final step was to fill what remained of the channels with ordinary cement or mastic. If all had been done correctly the window could be expected to remain intact for the next hundred years.
| Learning Module | Gallery | Links | Bibliography | Other Info | Final Project Home UW-Whitewater | Arts and Communication | Course Details | Search UWW |